
Welcome
Alternator Conversion
|
|
|
|
|
|
Using the Stock Generator Brackets to Mount a GM-style Alternator in a 1956 Ford
This method was described in an article in FoMoCo Times, the monthly publication of the Crown Victoria Association, by Steve Behuniak.
The advantages to this method are:
1. No welding is required
2. The car may be returned to original stock configuration with little effort.
Materials required are:
1. 2- offsets: 3/12ö pieces of 3/16ö x 1ö flat stock, drilled with 3/8ö and 7/16ö holes as shown
2. 1- 8ö piece of 7/16ö threaded rod
3.
1-7/16" x 3" hex bolt
4.
5- 7/16 hex nuts
5. 7/16ö washers or bushings as needed for correct spacing
6. a shorter fan belt will most likely be needed
Steps to convert stock brackets to alternator mount
1. Disconnect the battery. Itĺs a little easier to work in the area of the generator if the negative cable is removed.
2. Disconnect the harness from the generator.
3. Remove generator
4. Insert the 7/16ö threaded rod through the bracket with the nuts, offsets, spacers and alternator in the positions as shown. Tighten the bolts snugly, allowing for final adjustment.
5. Attach the old generator adjustment bracket to the alternator
6. Replace the fan belt, adjust tension and tighten all bolts.
I used a GM 10SI 63 amp alternator from Autozone P/N DL7127M. I paid $52.99 plus a $15.00 core charge. This alternator is from a 1980 Chevy Malibu and is a three-wire style.
Wiring
up the alternator using the stock '56 Ford generator
wiring harness is pretty simple. An alternator pigtail
is also needed. I used NAPA P/N VRC148 $3.77.
1. Disconnect the battery
2. Remove the #10 Yellow/Black wire from the
"A" terminal on the voltage requlator and
attach it to the "B" terminal. (It is OK to
leave the "B" terminal connected to the
circuit.)
3. Remove the Black/White band wire from the
"F" terminal on the regulator and remove the
18 GA yellow/black wire from the
"A" terminal (there were two black/yellow
wires on the "A" terminal). Take these two
wires and connect them together. In summary, this should
leave you with two 10 GA wires on the "B"
terminal, two 18 GA wires connected together by
themselves, and no wires on the "A" or
"F" terminals.
4. At the alternator, attach the pigtail to the
alternator (most pigtails have a large 12 GA, usually
red wire and a small wire, usually white). You must make
sure the larger wire is in the #2 ("F") slot
on the alternator and attach an eyelet with a #12 size
hole. Connect this wire along with the 10 GA
yellow/black from the harness to the "BAT"
terminal on the alternator.
5. Connect the 18 GA black/white band wire from the
harness to the new pigtail small wire that goes to the
#1 ("R") slot on the alternator.
6. The 18 GA black/red wire in the harness is a ground
and can be connected to one of the case cover bolts. Run
a 10 GA ground wire from the case ground to the frame to
insure a solid ground connection.
7. Reattach the battery terminals.
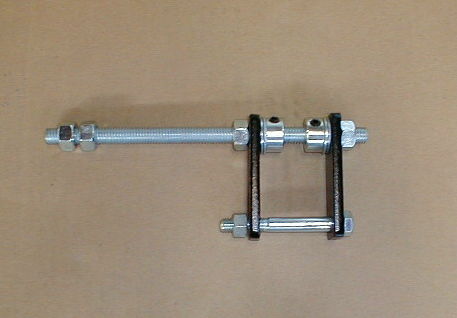
Bracket parts assembled

Bracket pieces shown attached to alternator

Bracket and alternator mounted on 292 Y-block
![]()
Steven Wright quotes
- 42.7 percent of all statistics are made up on the spot.
- A conscience is what hurts when all your other parts feel so good.
- All those who believe in psychokinesis, raise my hand.